【2026年版】git cloneでブランチを指定する完全ガイド(-b / –depth オプション)
「特定のブランチだけをcloneしたい」「履歴なしで軽量にcloneしたい」と思ったことはないでしょうか。デフォルトの git clone はリポジトリ全体を取得するため、大規模リポジトリでは時間もディスクも消費します。
このガイドでは、-b オプションによるブランチ指定・--depth オプションによるshallow clone・--single-branch フラグの組み合わせまで、実際のユースケースに沿って体系的に解説します。
筆者自身がMonorepo構成・CI/CD環境での実運用で検証したコマンドをベースに記述しています。単なるオプション一覧ではなく、なぜそのオプションが必要なのか・使わないとどうなるかを含めて解説します。
前提条件
このガイドを進める前に、以下の環境・知識が必要です。
- 環境: macOS / Linux / Windows(WSL2推奨)
- 必要なツール: Git 2.x以上
- 前提知識: コマンドライン基本操作、Gitの基本概念(commit・branch・remote)
# バージョン確認コマンド
git --version
# 期待する出力: git version 2.43.0 (以上であれば問題なし)
なくてもOK: GitHubアカウント。ローカルのGitリポジトリで動作確認できます。SSH認証よりHTTPSの方が手軽ですが、どちらでも手順は同じです。
全体の流れ
このガイドは以下の5ステップで構成されています。
- 基本: デフォルトのgit cloneの動作を理解する — 5分
- ブランチを指定してcloneする(-b オプション) — 5分
- 履歴を省略してcloneする(–depth オプション) — 5分
- –single-branchで1つのブランチだけを取得する — 5分
- 応用編: CI/CD・Monorepo・サブディレクトリ取得
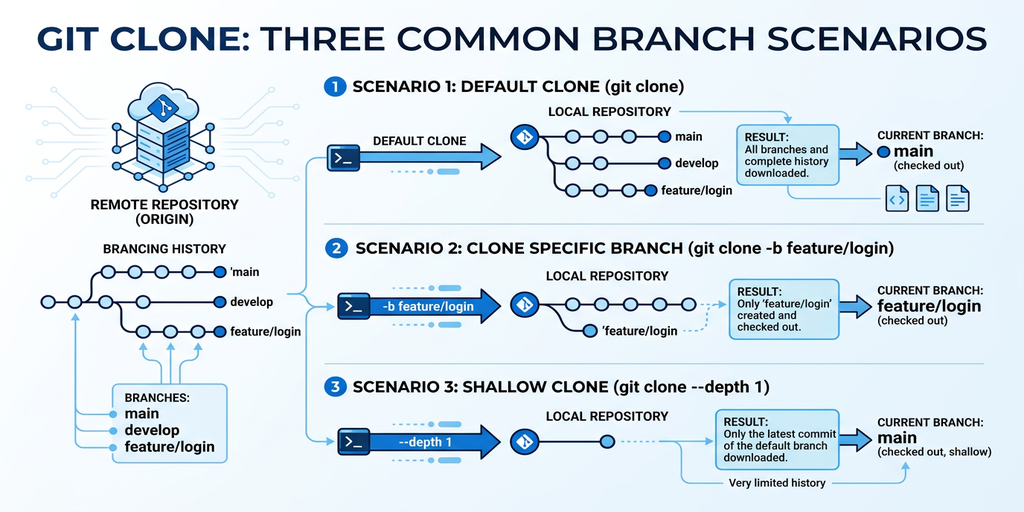
ステップ1: デフォルトのgit cloneの動作を理解する
-b や --depth の意味を正確に把握するには、まずデフォルトのcloneが何をするかを理解する必要があります。
デフォルトcloneが取得するもの
git clone https://github.com/example/myrepo.git
上記コマンドは以下をすべて取得します。
- リポジトリの全ブランチの参照(
refs/remotes/origin/*) - 全コミット履歴(最初のコミットから現在まで)
- 全タグ
- デフォルトブランチ(通常
mainまたはmaster)をチェックアウト
# cloneしたあとにブランチ一覧を確認する
git branch -a

# 出力例
* main
  remotes/origin/HEAD -> origin/main
  remotes/origin/develop
  remotes/origin/feature/new-api
  remotes/origin/release/v2.0
remotes/origin/ 以下にすべてのリモートブランチが見えます。ローカルにチェックアウトされているのは main だけですが、すべてのブランチのオブジェクト(コミット・ツリー・ブロブ)はローカルに落ちています。
大規模リポジトリでのデメリット
| リポジトリ規模 | デフォルトclone時間の目安 | ディスク使用量の目安 |
|---|---|---|
| 小規模(〜1,000コミット) | 数秒 | 数MB〜数十MB |
| 中規模(〜10,000コミット) | 10〜60秒 | 数十MB〜数百MB |
| 大規模(100,000コミット超) | 数分〜十数分 | 数GB〜 |
Linux kernelリポジトリ(約100万コミット)をデフォルトcloneすると、転送量は約4GBを超えます。CI/CDで毎回フルcloneしていると、ビルド時間の大半がcloneになりかねません。
✅ ステップ1完了の確認: git clone のデフォルト動作が「全ブランチの全履歴を取得する」ことを理解できた。
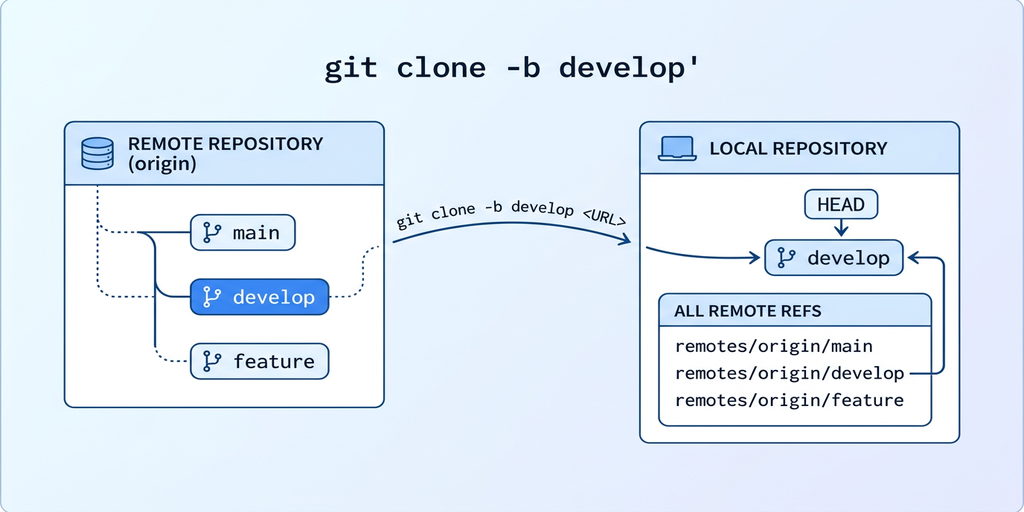
ステップ2: ブランチを指定してcloneする(-b オプション)
-b(または --branch)オプションを使うと、cloneしたあとにチェックアウトするブランチを指定できます。
基本構文
git clone -b <ブランチ名> <リポジトリURL>
git clone --branch <ブランチ名> <リポジトリURL>
-b と --branch は同義です。
実行例
# developブランチを指定してclone
git clone -b develop https://github.com/example/myrepo.git

# cloneディレクトリ名も同時に指定する場合
git clone -b develop https://github.com/example/myrepo.git myrepo-dev
# チェックアウト状態を確認
cd myrepo
git branch
# 出力:
# * develop

git log --oneline -3
# 出力例:
# a1b2c3d feat: add new API endpoint
# e4f5g6h fix: resolve null pointer in service
# i7j8k9l refactor: extract common utility
-b でタグを指定する
-b はブランチ名だけでなくタグ名も指定できます。
# v2.0.0 タグでclone(リリース版の検証に便利)
git clone -b v2.0.0 https://github.com/example/myrepo.git
タグを指定した場合、HEAD は detached HEAD 状態になります。
git status
# HEAD detached at v2.0.0
タグ指定cloneは特定リリースの動作確認や、本番環境に合わせた検証に有効です。
よくある誤解: -b を指定してもすべての履歴は取得される
重要な注意点として、-b だけではダウンロードするデータ量は減りません。
git clone -b develop https://github.com/example/myrepo.git
このコマンドは develop ブランチをチェックアウトしますが、他のブランチの参照と履歴も取得します。ネットワーク転送量・ディスク使用量を減らしたい場合は、次のステップで解説する --depth や --single-branch との組み合わせが必要です。
よくあるミス:
-bを使ったのにgit branch -aで他のブランチが見える → 正常動作です。-bはチェックアウト先を変えるだけで、取得ブランチを絞るオプションではありません。
✅ ステップ2完了の確認: -b develop でdevelopブランチがチェックアウトされた状態でcloneできる。git branch で * develop が表示される。
ステップ3: 履歴を省略してcloneする(–depth オプション)
--depth <N> を使うと、最新の N コミットだけを取得するshallow clone(浅いクローン)が行えます。
# 最新1コミットだけ取得(最も軽量)
git clone --depth 1 https://github.com/example/myrepo.git

# 最新10コミットを取得
git clone --depth 10 https://github.com/example/myrepo.git
–depth 1 の効果
Linux kernelリポジトリ(通常4GB超)を --depth 1 でcloneした場合の比較です。
| 条件 | 転送データ量の目安 | clone時間の目安 |
|---|---|---|
| デフォルトclone | 約4GB | 数十分 |
--depth 1 |
約200MB〜数百MB | 1〜3分 |
差は10倍〜20倍以上になることもあります。CI/CDでのビルドパイプラインや、コードを読むだけの目的でのcloneには非常に有効です。
shallow cloneの中身を確認する
git clone --depth 1 https://github.com/example/myrepo.git
cd myrepo

git log --oneline
# 出力例(最新の1コミットのみ):
# a1b2c3d (HEAD -> main, origin/main) feat: release v3.0.0

git log --oneline | wc -l
# 出力: 1
shallow cloneリポジトリには .git/shallow ファイルが作成されます。
cat .git/shallow
# 出力例:
# a1b2c3d4e5f6789012345678901234567890abcd
このファイルにshallow cutoff(履歴の切れ目)のコミットSHAが記録されています。
shallow cloneの制限事項
shallow cloneには以下の制限があります。実運用で引っかかりやすい点をまとめます。
1. git blame の範囲が限られる
# --depth 1 のshallow cloneでgit blameを実行
git blame src/main.py
# shallow cutoff より古いコミットは "^" で始まるSHAで表示され、詳細不明になる
2. git merge や git rebase でエラーになる場合がある
shallow cloneのブランチに対して、取得範囲外のコミットを含むブランチをmergeしようとするとエラーになります。
git merge origin/feature/old-branch
# fatal: shallow file has changed since we read it
3. git fetch --unshallow で完全履歴に戻せる
# shallow cloneを通常のfull cloneに変換する
git fetch --unshallow
これにより、shallow cloneで始めても後から完全な履歴を取得できます。
よくあるミス: shallow cloneのリポジトリでPRを作ろうとしてエラーになる →
git fetch --unshallowで解決するか、最初から--depthを使わずcloneする。
✅ ステップ3完了の確認: --depth 1 でcloneしたリポジトリで git log --oneline | wc -l が 1 を返す。
ステップ4: –single-branchで1つのブランチだけを取得する
--single-branch フラグを使うと、-b で指定したブランチ(または --depth と組み合わせた場合のデフォルトブランチ)だけを取得します。他のブランチの参照・履歴はダウンロードされません。
基本構文と効果
# developブランチの全履歴だけを取得(他ブランチなし)
git clone -b develop --single-branch https://github.com/example/myrepo.git

# developブランチの最新1コミットだけを取得(最小構成)
git clone -b develop --depth 1 --single-branch https://github.com/example/myrepo.git
--single-branch 追加後のブランチ一覧の違いを確認します。
# --single-branch なし(デフォルト)
git branch -a
# * develop
#   remotes/origin/HEAD -> origin/main
#   remotes/origin/develop
#   remotes/origin/feature/new-api
#   remotes/origin/main
#   remotes/origin/release/v2.0

# --single-branch あり
git branch -a
# * develop
#   remotes/origin/develop
remotes/origin/develop 以外のリモートブランチが存在しません。
–single-branch後に他のブランチを取得したくなった場合
# リモートの追跡設定を確認(--single-branchだと制限されている)
git remote show origin

# 他のブランチを後から取得する
git remote set-branches origin '*'
git fetch --all

# これで全ブランチが取得できるようになる
git branch -a
git remote set-branches origin '*' でリモートの追跡設定をリセットし、git fetch --all で全ブランチを取得できます。
3オプションの組み合わせ早見表
| コマンド | チェックアウト | 取得ブランチ | 取得履歴 | 用途 |
|---|---|---|---|---|
git clone URL |
デフォルト | 全ブランチ | 全コミット | 一般的な開発 |
git clone -b dev URL |
develop | 全ブランチ | 全コミット | 特定ブランチから開発開始 |
git clone --depth 1 URL |
デフォルト | 全ブランチ | 最新1コミット | 軽量取得(参照あり) |
git clone -b dev --single-branch URL |
develop | developのみ | 全コミット | 1ブランチだけ必要 |
git clone -b dev --depth 1 --single-branch URL |
develop | developのみ | 最新1コミット | CI/CD・最小構成 |
✅ ステップ4完了の確認: --single-branch 追加後、git branch -a で指定ブランチ以外のリモートブランチが表示されない。
応用編
基本的なオプションを理解したら、実際のユースケースに合わせた応用的な使い方を紹介します。
応用例1: GitHubのPR(プルリクエスト)ブランチをcloneする
GitHubのPRブランチは通常のブランチ名と異なり、refs/pull/<PR番号>/head という参照で管理されています。
# PR #123 のブランチをローカルに取得する
git clone https://github.com/example/myrepo.git
cd myrepo
git fetch origin pull/123/head:pr-123
git checkout pr-123
cloneしてからfetchする形になりますが、-b で直接PRブランチを取得することはできません(GitHubの仕様上、PRの参照は通常のブランチとは別の名前空間にあるため)。
応用例2: サブディレクトリだけをsparse-checkoutで取得する
Git 2.25以降では --sparse と --filter=blob:none の組み合わせで、Monorepoの特定ディレクトリだけを取得できます。
# sparse-checkoutの初期化
git clone --filter=blob:none --sparse https://github.com/example/monorepo.git
cd monorepo

# 取得したいサブディレクトリを指定
git sparse-checkout set packages/my-service

# 確認
ls
# packages/my-service  ← 指定したディレクトリのみ存在
--filter=blob:none はblobオブジェクト(ファイルの実体)を遅延フェッチし、アクセスが必要になった時点でダウンロードします。これにより、大規模Monorepoでも必要なファイルだけを高速に取得できます。
応用例3: ミラーcloneで全参照を完全に複製する
バックアップやGitホスティングの移行に使うミラーcloneです。
# ミラーclone(全ブランチ・タグ・PRの参照すべてを含む)
git clone --mirror https://github.com/example/myrepo.git myrepo.git

# ミラーリポジトリの内容確認
git -C myrepo.git branch -a | head -10
--mirror は --bare を含み、さらにすべてのrefspecを取得します。別のGitホストへの移行時に有効です。
CI/CD への組み込み
GitHub Actionsでのshallow clone設定例です。actions/checkout はデフォルトで --depth 1 の相当を行いますが、fetch-depth を調整できます。
# .github/workflows/build.yml
name: Build

on: [push, pull_request]

jobs:
  build:
    runs-on: ubuntu-latest
    steps:
      # デフォルト(fetch-depth: 1 = shallow clone相当)
      - uses: actions/checkout@v4

      # 全履歴が必要な場合(git blame・git log全件など)
      - uses: actions/checkout@v4
        with:
          fetch-depth: 0

      # 特定ブランチをclone
      - uses: actions/checkout@v4
        with:
          ref: develop
          fetch-depth: 1
fetch-depth: 0 で全履歴を取得します。git describe コマンドやバージョン計算スクリプトを使う場合は全履歴が必要なことが多いです。
GitLab CIでの設定例です。
# .gitlab-ci.yml
variables:
  GIT_DEPTH: "1"           # shallow clone(デフォルト50→1に変更)
  GIT_STRATEGY: fetch       # fetchで差分のみ取得(cloneより高速)

build:
  script:
    - echo "Shallow clone with depth 1"
トラブルシュート
このガイドを進める中でよくある問題と解決策をまとめました。
| 症状 | 原因 | 解決策 |
|---|---|---|
error: pathspec 'develop' did not match any file(s) known to git |
-b に指定したブランチがリモートに存在しない |
git ls-remote --heads <URL> でリモートのブランチ一覧を確認する |
fatal: shallow file has changed since we read it |
shallow cloneのブランチに対してmergeしようとした | git fetch --unshallow で完全履歴を取得してからmergeする |
--depth 指定後に git log で古いコミットが見えない |
正常動作(shallow cloneの仕様) | git fetch --unshallow か git fetch --depth <大きい数> で履歴を伸ばす |
--single-branch 後に他のブランチが git fetch できない |
リモート追跡設定が1ブランチのみになっている | git remote set-branches origin '*' && git fetch --all で復元する |
タグ指定で HEAD detached at v2.0.0 になる |
タグはブランチでないため detached HEAD が正常 | 開発を続けるなら git checkout -b my-branch でブランチを切る |
shallow cloneで git blame の表示が不完全 |
取得範囲外のコミットは追跡できない | 必要なら git fetch --depth <N> でより深い履歴を取得する |
まとめ
このガイドでは git clone のブランチ指定と軽量取得オプションについて、以下の手順で解説しました。
- ステップ1: デフォルトのcloneは全ブランチ・全履歴を取得することを確認
- ステップ2:
-bオプションでチェックアウトするブランチを指定(全履歴は依然取得) - ステップ3:
--depth 1でshallow cloneし、転送量を大幅削減(10〜20倍以上の差) - ステップ4:
--single-branchで指定ブランチのみの参照に絞り込む
実運用での推奨は、CI/CDでは -b <ブランチ名> --depth 1 --single-branch の組み合わせです。これにより最小のデータ転送量でビルドパイプラインが動作します。
開発用途でブランチ切り替えや全履歴参照が必要な場合は、デフォルトcloneか -b のみの組み合わせが適切です。shallow cloneに起因するエラーに遭遇したら git fetch --unshallow で回復できることを覚えておいてください。