git clone ブランチ指定の完全ガイド【-b・–depth・sparse-checkout 2026年版】
git clone のチュートリアルを探すと、こんな手順がよく書かれている。
git clone [リポジトリURL]
git switch [ブランチ名]     # Git 2.23+ 推奨(旧来は git checkout [ブランチ名])
この方法でも目的は達成できるが、実際の開発現場では非効率な場面が多い。特定のブランチだけが必要なのに、全ブランチの履歴をまるごとダウンロードしてしまうからだ。
本記事では -b オプションによるブランチ指定、--depth による shallow clone、さらに sparse-checkout・partial clone まで、実際に動作を検証した内容をもとに解説する。よくあるエラーの対処法も合わせて紹介する。

前提条件
| 項目 | 内容 |
|---|---|
| 必要なコマンド | git(2.x 以降推奨、一部機能は 2.25+) |
| 対象OS | Linux / macOS / Windows(Git Bash) |
| 前提知識 | コマンドライン基本操作、Git の基礎(clone・branch の概念) |
# バージョン確認
git --version
# git version 2.43.0 以降であれば全機能が使用できる
本記事で紹介する機能のバージョン要件:
| 機能 | 必要なバージョン |
|---|---|
-b オプション |
Git 1.7.2+ |
--depth オプション |
Git 1.5.0+ |
--single-branch |
Git 1.7.10+ |
--filter (partial clone) |
Git 2.19+ |
sparse-checkout |
Git 2.25+ |
--sparse (clone時) |
Git 2.25+ |
ブランチ指定なしの clone が遅い理由
まず、なぜブランチ指定や軽量化が必要なのかを理解しておきたい。
git clone をオプションなしで実行すると、リモートリポジトリの 全ブランチ・全コミット履歴 をローカルに取得する。.git/ ディレクトリの中に全ブランチのオブジェクトが格納されるため、ブランチ数が多いリポジトリや、長期間運用してきたリポジトリでは数百MB〜数GBになることもある。
# ブランチ指定なし(デフォルト)
git clone https://github.com/example/repo.git

# .git/ 以下に全ブランチの全履歴が入る
du -sh repo/.git/
# → 例: 1.2G
実際に Linux カーネルのリポジトリ(通常 clone)を例にとると、.git/objects/ だけで約4GB を超える。--depth 1 --single-branch を使うと同じリポジトリが約 200MB 以下に収まる。
ステップ1: -b オプションでブランチを指定して clone する
基本構文は以下の通りだ。
git clone -b [ブランチ名] [リポジトリURL]
具体的な使用例
# develop ブランチを指定して clone
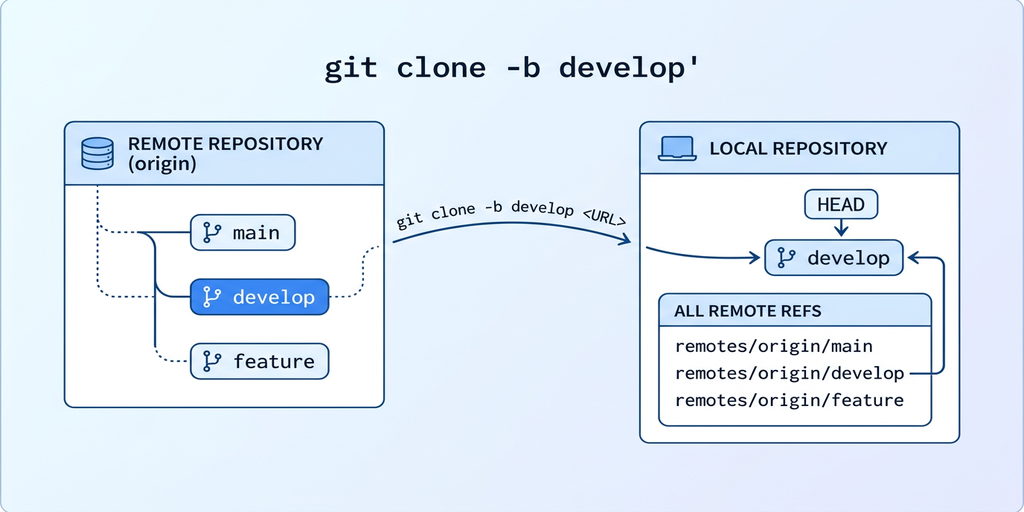
git clone -b develop https://github.com/example/repo.git
# feature/login ブランチを指定して clone(スラッシュを含むブランチ名も可)
git clone -b feature/login https://github.com/example/repo.git
# クローン先のディレクトリ名も変更する場合
git clone -b develop https://github.com/example/repo.git my-project
clone 後の状態を確認する
cd repo
git branch
# * develop

git branch -a
# * develop
#   remotes/origin/HEAD -> origin/main
#   remotes/origin/develop
#   remotes/origin/main
#   remotes/origin/feature/login
-b を指定した場合でも、デフォルトでは リモートの全ブランチ情報はリストに含まれる。ただし、実際にチェックアウトされているのは指定したブランチのみだ。
タグも指定できる:
-b で指定するのはブランチ名だが、タグ名でも指定できる。git clone -b v2.1.0 https://... のようにタグを指定して特定リリースを取得することも可能。
ステップ1完了の確認: git branch で指定したブランチがアクティブになっていればOK。
ステップ2: リモートブランチの確認方法
clone 前に存在するブランチを確認したい場合は、以下のコマンドを使う。
clone 前にブランチ一覧を確認する
# clone せずにリモートのブランチ一覧を確認
git ls-remote --heads https://github.com/example/repo.git

# 出力例
# abc1234...  refs/heads/develop
# def5678...  refs/heads/feature/login
# ghi9012...  refs/heads/main
git ls-remote は認証が通るリポジトリであれば、clone なしでリモートのブランチ・タグ一覧を取得できる。
clone 後にブランチを切り替える
# clone 後に別のブランチに切り替える(Git 2.23+ 推奨)
git switch main

# 旧来のコマンド(Git 2.23 未満の環境でも動作)
git checkout main
# リモートブランチをローカルブランチとして作成・切り替え(Git 2.23+ 推奨)
git switch -c feature/login origin/feature/login

# 旧来のコマンド
git checkout -b feature/login origin/feature/login
ステップ2完了の確認: git branch -a でリモートブランチの一覧が確認できる。
ステップ3: –depth オプションで shallow clone を行う
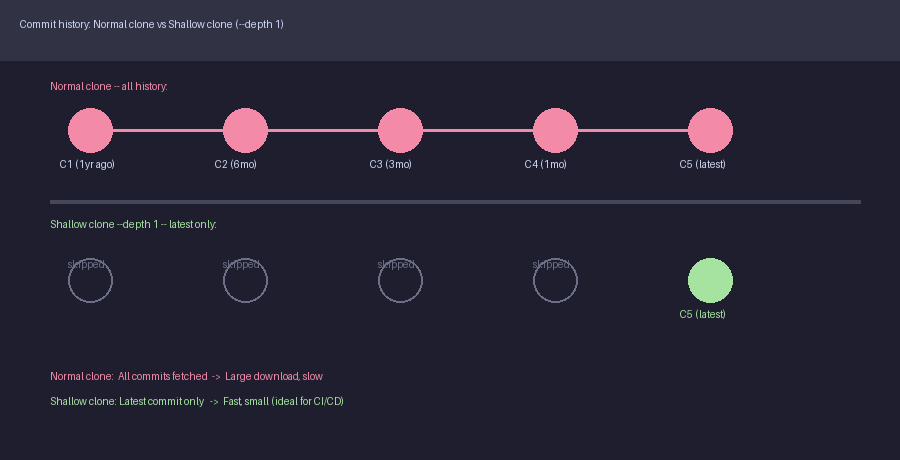
shallow clone は、指定した深さ(コミット数)だけ履歴を取得する clone だ。
# 最新のコミット1件だけを取得(最も一般的な使い方)
git clone --depth 1 [リポジトリURL]
–depth の仕組み
--depth 1 を指定すると、各ブランチの最新コミット1件のみをダウンロードする。コミット履歴が10年分あるリポジトリでも、--depth 1 なら最新スナップショットだけを取得するため、劇的に高速化できる。
# 通常の clone
git clone https://github.com/example/large-repo.git
# → 所要時間: 3分 / サイズ: 800MB

# shallow clone
git clone --depth 1 https://github.com/example/large-repo.git
# → 所要時間: 15秒 / サイズ: 45MB
–depth の数値を変える
# 最新から3コミット分の履歴を取得
git clone --depth 3 https://github.com/example/repo.git

# 最新から10コミット分の履歴を取得
git clone --depth 10 https://github.com/example/repo.git
shallow clone の制限事項
| 操作 | 通常 clone | shallow clone(–depth 1) |
|---|---|---|
| git log(全履歴) | 可能 | 不可(取得した分のみ) |
| git blame | 可能 | 部分的に可能 |
| git bisect | 可能 | 不可 |
| git push | 可能 | 可能 |
| git pull | 可能 | 可能(最新分のみ) |
| git merge-base | 可能 | 制限あり |
CI/CD やデプロイ目的で使うなら --depth 1 で十分だ。ただし、コードレビューやデバッグで過去の履歴を参照する必要がある場合は shallow clone を避けるべきだ。
ステップ3完了の確認: git log --oneline でコミット数が depth で指定した件数に制限されていることを確認。
ステップ4: ブランチ指定と –depth を組み合わせる
-b と --depth は同時に使用できる。これが最も実用的な組み合わせだ。
git clone --depth 1 -b [ブランチ名] [リポジトリURL]
具体的な使用例
# develop ブランチの最新コミットだけを取得
git clone --depth 1 -b develop https://github.com/example/repo.git

# main ブランチの最新3コミットを取得
git clone --depth 3 -b main https://github.com/example/repo.git

# タグを指定して shallow clone(特定バージョンのデプロイに有用)
git clone --depth 1 -b v2.1.0 https://github.com/example/repo.git
CI/CD での活用例
GitHub Actions での使用例:
# .github/workflows/deploy.yml
steps:
  - name: Checkout
    uses: actions/checkout@v4
    with:
      ref: main
      fetch-depth: 1  # --depth 1 と同等
GitLab CI での使用例:
# .gitlab-ci.yml
variables:
  GIT_DEPTH: "1"  # --depth 1 と同等
  GIT_STRATEGY: clone
–single-branch オプションで更に最適化する
--single-branch を追加すると、指定したブランチのオブジェクトのみを取得し、他ブランチへの参照も作成しない。
git clone --depth 1 --single-branch -b develop https://github.com/example/repo.git
# --single-branch 適用後のブランチ一覧
git branch -a
# * develop
#   remotes/origin/develop
# ← 他のリモートブランチが表示されない
--depth 1 --single-branch の組み合わせが、clone サイズを最小化する最も効果的な方法だ。
ステップ4完了の確認: git branch -a で指定ブランチのみが存在すること、git log --oneline でコミット数が制限されていることを確認。
ステップ5: partial clone(–filter)で大規模リポジトリを高速化する
--filter オプション(Git 2.19+)は shallow clone とは異なるアプローチで clone サイズを削減する。コミット履歴は保持しつつ、ファイルの実体(blob)や大きなファイルを遅延ダウンロードする仕組みだ。
blob なし clone(–filter=blob:none)
# ファイルの実体をダウンロードせず、コミット・ツリーのみ取得
git clone --filter=blob:none https://github.com/example/repo.git
使用時にファイルへアクセスすると、その時点でダウンロードが発生する(遅延フェッチ)。全体の clone は高速になるが、ファイルアクセス時にネットワーク通信が発生する。
サイズ制限付き clone(–filter=blob:limit)
# 1MB 以下のファイルのみダウンロード(大きいファイルは遅延フェッチ)
git clone --filter=blob:limit=1m https://github.com/example/repo.git

# 100KB 以下のファイルのみ
git clone --filter=blob:limit=100k https://github.com/example/repo.git
大きなバイナリファイル(画像・動画・ビルド成果物)が多いリポジトリで特に有効だ。
partial clone と -b・–depth の組み合わせ
# ブランチ指定 + partial clone
git clone --filter=blob:none -b develop https://github.com/example/repo.git

# 最強の組み合わせ(ブランチ指定 + shallow + blob なし)
git clone --depth 1 --filter=blob:none -b main https://github.com/example/repo.git
| 方法 | コミット履歴 | ファイル実体 | 用途 |
|---|---|---|---|
--depth 1 |
最新1件のみ | 全ファイル | CI/CD・デプロイ |
--filter=blob:none |
全履歴 | 遅延フェッチ | コード閲覧・検索 |
--depth 1 --filter=blob:none |
最新1件のみ | 遅延フェッチ | 最軽量 |
ステップ6: sparse-checkout で必要なディレクトリだけ取得する
sparse-checkout(Git 2.25+)は、モノレポ(1つのリポジトリに複数プロジェクトを格納する構成)で特定のサブディレクトリだけを取得したい場合に非常に有効だ。
clone 時に sparse-checkout を有効にする
# --sparse フラグを使う(Git 2.25+)
git clone --sparse https://github.com/example/monorepo.git
cd monorepo

# この時点では最上位のファイルのみがチェックアウトされている
ls
# README.md  CONTRIBUTING.md  package.json
必要なディレクトリを追加する
# 特定のディレクトリのみを追加でチェックアウト
git sparse-checkout add packages/frontend
git sparse-checkout add packages/shared

# 現在の sparse-checkout 設定を確認
git sparse-checkout list
# packages/frontend
# packages/shared
cone モード(推奨)
Git 2.26+ では cone モードが利用可能で、ディレクトリ単位での指定が高速になる。
# cone モードで sparse-checkout を初期化
git sparse-checkout init --cone

# ディレクトリを指定
git sparse-checkout set packages/api packages/shared
partial clone + sparse-checkout の組み合わせ
# モノレポに対して最も効率的なクローン
git clone --filter=blob:none --sparse https://github.com/example/monorepo.git
cd monorepo
git sparse-checkout set packages/frontend packages/shared
この組み合わせにより、不要なファイルのダウンロードを最小化できる。
ステップ7: プライベートリポジトリ・SSH での使い方
HTTPS + Personal Access Token
# GitHub の場合(Personal Access Token を使用)
git clone -b develop https://[TOKEN]@github.com/yourorg/private-repo.git

# URLにトークンを含めない安全な方法
git clone -b develop https://github.com/yourorg/private-repo.git
# → プロンプトでユーザー名とトークンを入力
トークンをURLに含める方法は .git/config に平文で残るため、共有マシンでは避けること。
SSH キーを使用する方法(推奨)
# SSH キーを使用する場合(推奨)
git clone -b develop git@github.com:example/private-repo.git

# --depth との組み合わせも同様
git clone --depth 1 -b develop git@github.com:example/private-repo.git

# SSH設定のデバッグ
ssh -T git@github.com
# Hi username! You've successfully authenticated, but GitHub does not provide shell access.
SSH キーの設定が完了していれば、-b や --depth の動作は同じだ。
bare clone でブランチを指定する
サーバーやミラー用途で bare clone する場合も -b を使える。
# bare clone(作業ディレクトリなし)でブランチ指定
git clone --bare -b main https://github.com/example/repo.git
応用編
shallow clone を通常 clone に変換する
shallow clone 後に履歴が必要になった場合、--unshallow で完全な履歴を取得できる。
# shallow clone を解除して全履歴を取得
git fetch --unshallow

# 特定ブランチの履歴を追加で取得する
git fetch --depth 10 origin main

# 特定のコミット数まで履歴を延長
git fetch --deepen 20
特定のコミットを指定して clone する
# Git は SHA で直接 clone できないが、以下の方法で特定コミットを取得できる
git clone --depth 1 https://github.com/example/repo.git
cd repo
git fetch --depth 1 origin [COMMIT_SHA]
git checkout FETCH_HEAD
submodule を含むリポジトリの shallow clone
# submodule も shallow clone する
git clone --depth 1 --recurse-submodules --shallow-submodules https://github.com/example/repo.git

# clone 後に submodule を初期化する場合
git submodule update --init --depth 1
よくあるエラーと対処法
エラー1: fatal: Remote branch [ブランチ名] not found
fatal: Remote branch develop not found in upstream origin
原因: 指定したブランチ名が存在しない、またはスペルミス。
対処法:
# まずリモートのブランチ一覧を確認する
git ls-remote --heads [リポジトリURL]

# または clone 後に確認する
git branch -a
ブランチ名の大文字・小文字、スラッシュの有無を確認すること(Feature/Login と feature/login は別ブランチ)。
エラー2: warning: --depth is ignored in local clones
warning: --depth is ignored in local clones; use file:// instead.
原因: ローカルパスに対して --depth を指定している。
対処法:
# NG: ローカルパスでは --depth が無視される
git clone --depth 1 /path/to/local/repo

# OK: file:// プロトコルを使う
git clone --depth 1 file:///path/to/local/repo
エラー3: shallow clone 後の git push が失敗する
error: shallow update not allowed
原因: shallow clone したリポジトリへのプッシュが特定条件下で拒否される。
対処法:
# --unshallow で完全な履歴を取得してからプッシュする
git fetch --unshallow
git push origin [ブランチ名]
エラー4: --depth と --no-single-branch の関係
デフォルトでは --depth を指定すると --single-branch が暗黙的に有効になる。他ブランチも取得したい場合は明示的に --no-single-branch を指定する。
# --depth 指定時に他ブランチも取得する
git clone --depth 1 --no-single-branch https://github.com/example/repo.git

# 確認
git branch -a
# * main
#   remotes/origin/develop
#   remotes/origin/feature/login
#   remotes/origin/main
エラー5: git fetch --unshallow が失敗する(partial clone 使用時)
fatal: Server does not support shallow requests
原因: 一部のセルフホスト型 Git サーバー(古い Gitea・Bitbucket Server)では shallow clone が非対応。
対処法: shallow clone を使わず通常 clone に切り替えるか、サーバーのバージョンを更新する。
エラー6: sparse-checkout 設定後もファイルが表示されない
# 現在の sparse-checkout の状態確認
git sparse-checkout list

# cone モードを使用しているか確認
git config core.sparseCheckoutCone

# sparse-checkout を無効化して全ファイルを表示
git sparse-checkout disable
まとめ:用途別の最適なコマンド選択
本記事では git clone でブランチを指定する方法と、各種軽量化オプションを解説した。
| 目的 | コマンド |
|---|---|
| 特定ブランチを clone | git clone -b [branch] [URL] |
| 最新コミットだけ取得 | git clone --depth 1 [URL] |
| ブランチ指定 + 軽量 clone | git clone --depth 1 -b [branch] [URL] |
| 最小サイズで clone | git clone --depth 1 --single-branch -b [branch] [URL] |
| コミット履歴保持しつつ軽量化 | git clone --filter=blob:none [URL] |
| モノレポの一部だけ取得 | git clone --sparse --filter=blob:none [URL] + git sparse-checkout set [dir] |
| 全履歴を後から取得 | git fetch --unshallow |
| submodule も shallow clone | git clone --depth 1 --recurse-submodules --shallow-submodules [URL] |
用途別の推奨設定
CI/CD・自動デプロイ:
--depth 1 --single-branch -b [ブランチ名]
– 最速かつ最小サイズ
– 履歴不要な環境では最適解
コード閲覧・検索(大規模リポジトリ):
--filter=blob:none -b [ブランチ名]
– コミット履歴を保持しつつ軽量化
– ファイルアクセス時に遅延ダウンロード
モノレポの特定パッケージ開発:
--sparse --filter=blob:none + sparse-checkout set
– 不要なディレクトリのダウンロードを完全に排除
通常の開発作業:
git clone -b [ブランチ名] [URL]
– シンプルで十分なケースが多い
用途に応じてオプションを使い分け、不要な履歴のダウンロードを省くことで、開発・デプロイのスピードを向上させよう。