
MacでDockerが遅い原因と解決策【2026年版Docker Desktop最適化ガイド】
この記事は2021年1月に公開した内容を2026年の最新情報にアップデートしました。Docker Desktopは大きく進化しており、当時推奨していたVirtualBox + Vagrant構成は現在ほとんどのケースで不要です。
2026年現在、Docker Desktop はもう遅くない
2021年当時、MacでDockerを使うと「ファイルシステムへのアクセスが遅い」という問題が深刻でした。当時の解決策はDocker Desktopを使わずにVirtualBox + Vagrantを使う方法でした。
しかし、Docker Desktop 4.x以降で大幅な速度改善が行われ、状況は一変しています。
主な改善内容:
| 改善内容 | バージョン | 効果 |
|---|---|---|
| VirtioFS | Docker Desktop 4.6〜 | ファイル同期速度が大幅向上(Intel/Apple Silicon両対応) |
| Rosetta for Linux | Docker Desktop 4.16〜 | Apple SiliconでIntel向けコンテナが高速動作 |
| Apple Silicon ネイティブ対応 | Docker Desktop 4.3〜 | M1/M2/M3/M4での動作が最適化 |
Docker Desktopの料金について: 2022年よりDocker Desktopは従業員数250名以上 or 年間売上$10M以上の企業では有料プランが必要です。個人開発者・小規模チーム・教育機関は引き続き無料で利用できます。有料プランに抵触する場合は、後述のOrbStackも選択肢になります。
VirtioFS と gRPC FUSE の実測比較(Intel Mac 2018 / macOS 15.7.4)
実際にIntel Mac 2018(macOS Sequoia 15.7.4 / Docker Desktop v4.61.0)で計測した結果です。
| テスト | VirtioFS | gRPC FUSE | 優位 |
|---|---|---|---|
| Write 200MB(連続書き込み) | 26.2 MB/s | 98.7 MB/s | gRPC FUSE が 3.8倍速い |
| Read 200MB(連続読み込み) | 196.0 MB/s | 76.8 MB/s | VirtioFS が 2.6倍速い |
| 小ファイル1000件作成 | 2ms | 5ms | VirtioFS が 2.5倍速い |
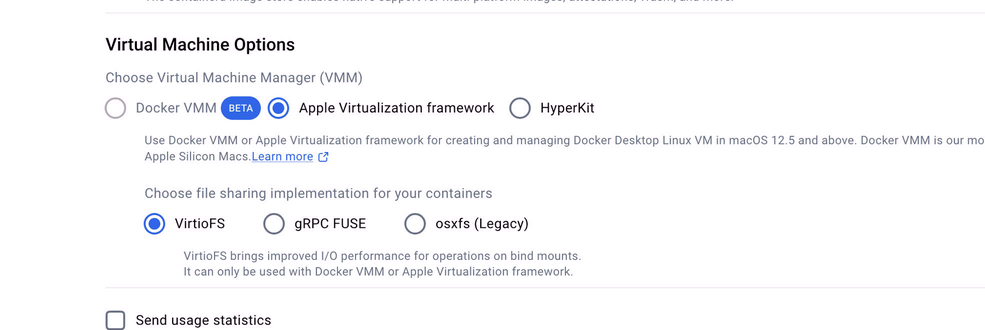
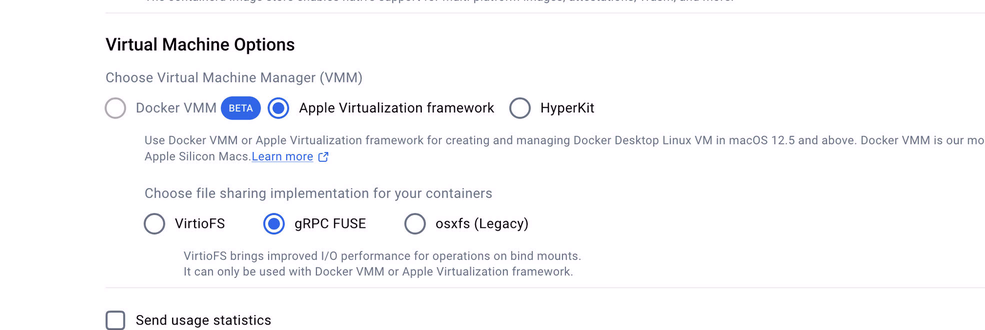
VirtioFS選択時:
gRPC FUSE選択時:
結論:開発用途ではVirtioFSが有利
開発中は node_modules や設定ファイルへの「読み込み」「小ファイルの大量アクセス」が圧倒的に多いため、VirtioFSが実用上は有利です。大容量ファイルの連続書き込みが多い特殊な用途では gRPC FUSE の方が速いケースもあります。
まずDocker Desktopを最新版にアップデートしよう
設定を変更する前に、Docker Desktopを最新版にアップデートしておきましょう。
- メニューバーの Docker アイコンをクリック
- Check for Updates を選択
- アップデートがあればインストールして再起動
Docker Desktopの設定を最適化しよう
最新版にしたら、設定を確認・最適化します。Intel Mac・Apple Silicon Mac のどちらでも有効な設定です。
1. VirtioFS を有効にする(最重要)
VirtioFSはmacOSとコンテナ間のファイル共有を高速化する仕組みです。Docker Desktop 4.6以降でデフォルト有効ですが、念のため確認しましょう。
- Docker Desktop のメニューバーアイコン → Settings(設定)
- General タブを開く
- Virtual Machine Options セクションを確認
- Choose file sharing implementation for your containers で
VirtioFSを選択 - 変更した場合は Apply & Restart で再起動
選択肢は
VirtioFS/gRPC FUSE/osxfs (Legacy)の3つです。必ずVirtioFSを選んでください。
2. リソース割り当てを増やす
Docker Desktop はデフォルトでCPU・メモリの割り当てが控えめです。Intel Mac・Apple Silicon Mac ともに有効です。
- Settings → Resources → Advanced
- CPUをマシンのコア数の半分以上に設定(例: 8コアなら4以上)
- メモリを8GB以上に設定(作業内容に応じて増減)
- Apply & Restart で再起動
3. Apple Silicon Mac の場合は Rosetta for Linux を有効にする
M1/M2/M3/M4 MacでIntel向けコンテナ(amd64)を動かす場合、Rosettaを有効にすると高速化されます。
- Settings → General
- Use Rosetta for x86_64/amd64 emulation on Apple Silicon にチェック
- Apply & Restart で再起動
それでも遅い場合の選択肢
Docker Desktop を最適化しても満足できない場合、以下の代替手段があります。
選択肢1: OrbStack(おすすめ)
OrbStack はDocker Desktopの代替アプリで、macOSでの動作に特化しており起動・動作ともに高速です。Docker Desktopの有料プランに抵触するケースでも、OrbStackは個人利用無料で使えます。
- Docker Desktop互換のCLI(既存の
dockerコマンドがそのまま使える) - 起動が素早い(数秒)
- メモリ使用量が少ない
- 個人利用は無料
# Homebrewでインストール
brew install orbstack
選択肢2: Lima + Docker(上級者向け)
Lima はmacOS上でLinux VMを動かすOSSツールです。Docker Desktopなしでdockerコマンドが使えます。
# インストール
brew install lima

# Docker対応のVMを起動
limactl start --name=docker template://docker

# docker CLIからLimaを使う
export DOCKER_HOST=$(limactl list docker --format 'unix://{{.Dir}}/sock/docker.sock')
選択肢3: コンテナ内でコードを書く(Volume マウントを避ける)
Volume マウントが遅さの主因の場合、コードをコンテナ内に直接配置することで解決できます。
# docker-compose.yml での例
services:
  app:
    build: .
    # volumes でのマウントを避けてCOPYで対応
VS Codeの Dev Containers 拡張機能と組み合わせると、コンテナ内で快適に開発できます。
Apple Silicon Mac での注意点
M1/M2/M3/M4 Macを使っている場合、追加の考慮事項があります。
マルチプラットフォームイメージを使う
DockerイメージはApple Silicon(arm64)とIntel(amd64)の両方に対応したものを使いましょう。arm64ネイティブの方がエミュレーションがない分高速です。
# プラットフォームを明示して pull
docker pull --platform linux/amd64 mysql:8.0

# または arm64 ネイティブを使う(こちらが速い)
docker pull --platform linux/arm64 mysql:8.0
公式イメージの多くはすでにマルチプラットフォーム対応済みです。
docker buildx でマルチプラットフォームビルド
自分でイメージをビルドする場合は docker buildx を使います。
# buildx の初期設定
docker buildx create --use

# arm64 と amd64 両方に対応したイメージをビルド
docker buildx build --platform linux/amd64,linux/arm64 -t yourimage:latest --push .
まとめ: 2026年のMac Docker高速化フロー
① Docker Desktop を最新版にアップデート
         ↓
② VirtioFS が有効か確認・設定後に再起動
         ↓
③ リソース割り当てを増やす(CPU・メモリ)→ 再起動
         ↓
④ Apple Silicon なら Rosetta for Linux を有効化 → 再起動
         ↓
⑤ まだ遅いなら OrbStack への乗り換えを検討
2021年当時に推奨していたVirtualBox + Vagrant構成は、現在ではほとんどのケースで不要になりました。まずはDocker Desktopの最新版へのアップデートと設定最適化から試してみてください。